The Marketing Engine is the campaign-management and QR-redirect service that sits in front of your online ordering app. Operators use it to build campaigns (Valpak inserts, table tents, receipt coupons, Yelp ads, app-launch promos, etc.), generate the QR codes that print on those materials, watch scans roll in live, and push the offer definitions to the POS so that every redemption is correctly attributed and discounted.
It runs as a standalone web app on port 3100 and exposes two surfaces: a public redirector at /c/:slug (the URL that QR codes encode) and an authenticated admin panel at /marketing. Campaigns created here are synced every 60 seconds to the merchant POS so the customer-facing PWA and the in-store terminals see the same offers.
1. Signing in
Open https://<your-host>/marketing/login. Enter the email and password you were issued by your administrator and click Sign in.
Passwords are stored with Argon2id, and the login form is rate-limited per IP — after five bad attempts in a row you will be locked out for fifteen minutes. If that happens, wait it out rather than retrying; the lockout window does not reset on success.
Once you are signed in, every page shows the top navigation bar:
- Marketing Engine (brand link, returns to the campaign list)
- Campaigns (the current page)
- Metrics (top-line scan counts for the last 1 h / 24 h / 7 d, available as JSON at
/marketing/metrics) - Deploy (pulls the latest code from GitHub and restarts the engine — use only when instructed)
- Sign out
Sign out when you are finished. Sessions persist via an HTTP-only cookie until they expire or you explicitly log out.
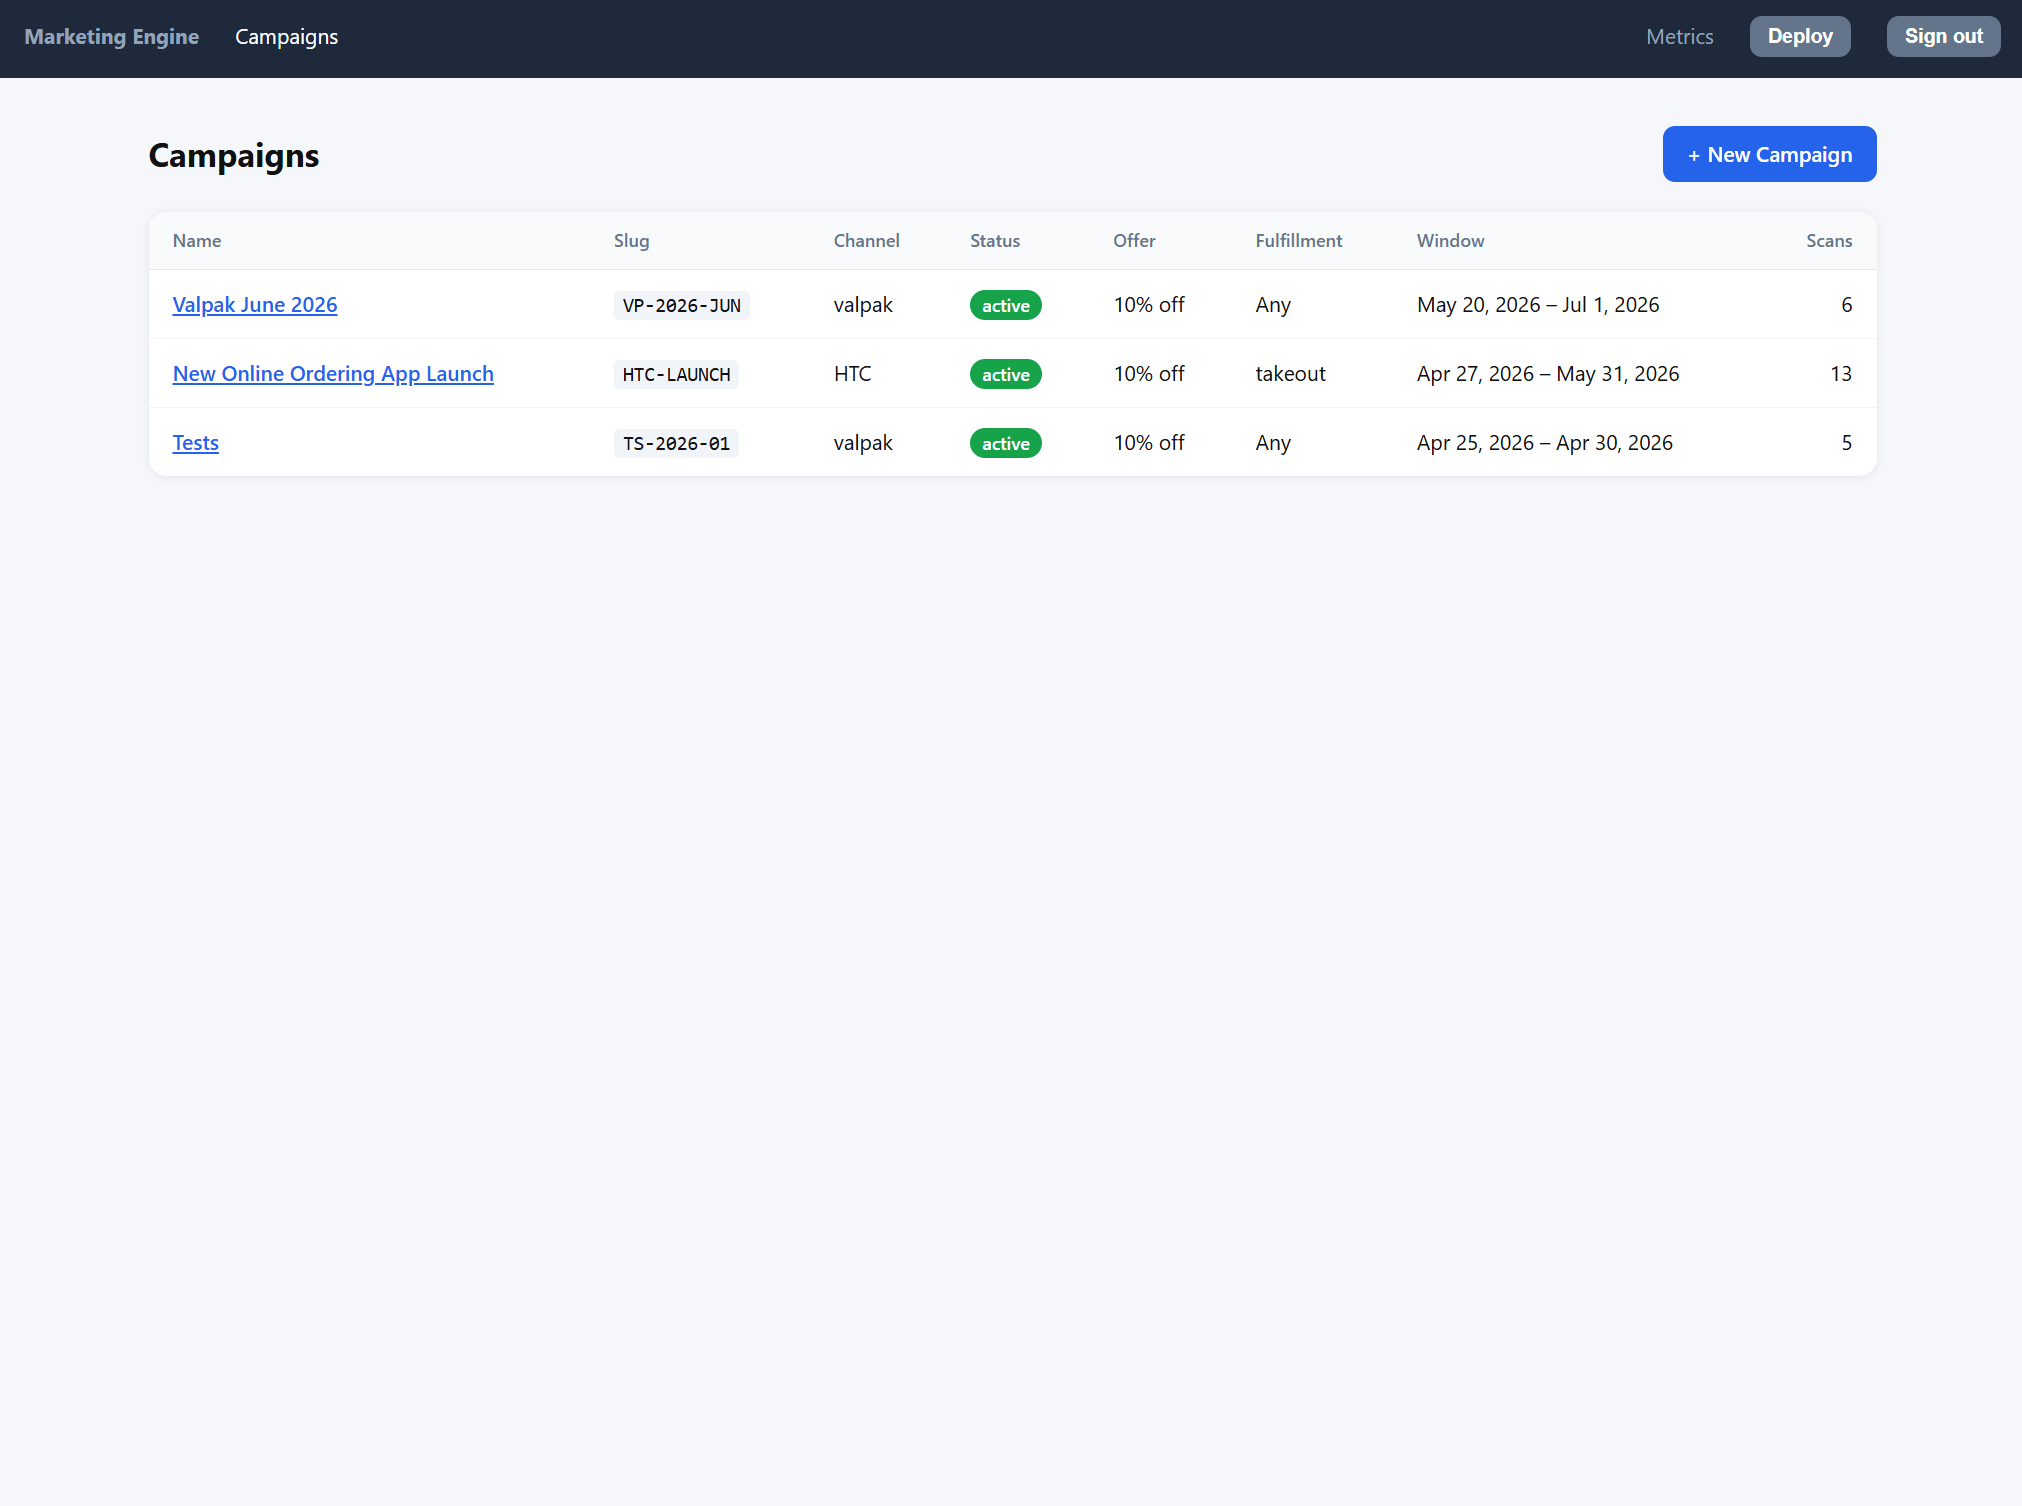
2. The campaign list
The home page of the admin panel is the campaign list. Each row corresponds to one campaign and shows:
- Name — the human-readable campaign name; click it to open the campaign detail page.
- Slug — the short identifier embedded in the QR code (e.g.
VP-2026-JUN,HTC-LAUNCH). It is shown in monospace because it appears verbatim in the printed URL. - Channel — where the campaign is distributed (
valpak,HTC,yelp,receipt,tabletent, etc.). The channel is free-form text so you can invent new ones without a code change. - Status —
draft,active,paused, orended. Onlyactivecampaigns redirect customers to the ordering app and onlyactivecampaigns are visible to the POS. - Offer — a short summary such as
10% offor$5.00 off. - Fulfillment — the dine-in / takeout / delivery restriction, or
Anyif the offer applies to every order type. - Window — the start and end calendar dates the campaign is valid for.
- Scans — the total number of times the QR code has been scanned over the life of the campaign.
To create a new campaign, click + New Campaign in the top-right of the page. To inspect or edit an existing one, click its name.
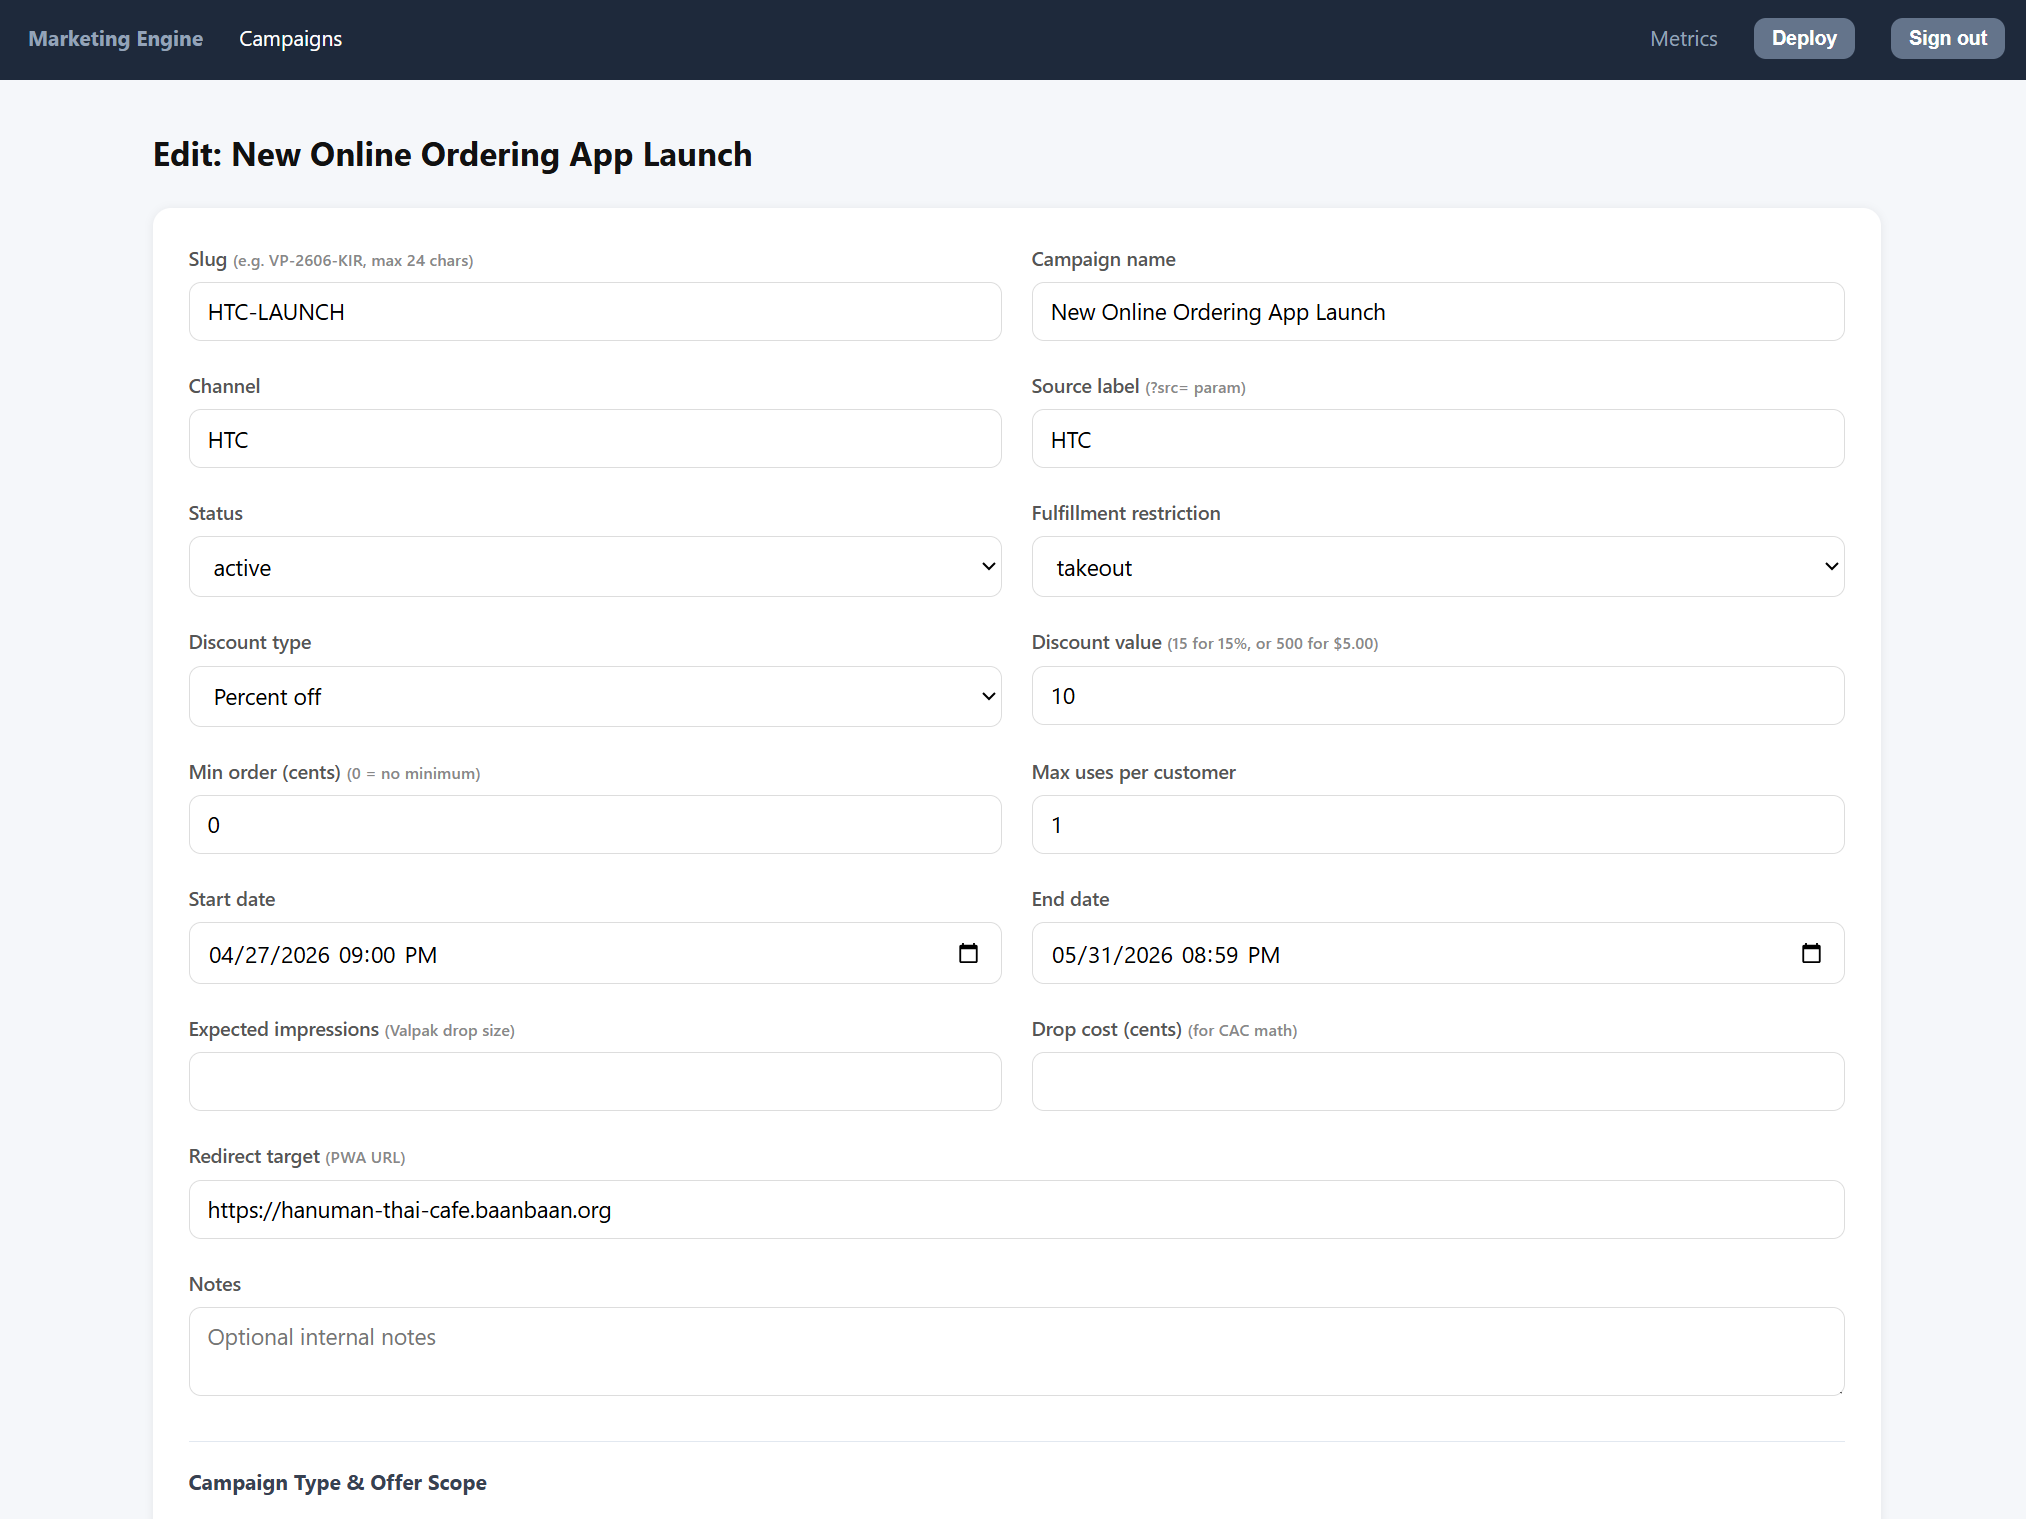
3. Creating or editing a campaign
The New Campaign and Edit forms are identical except that the slug becomes read-only once a campaign has been saved (changing a slug after the QR is printed would invalidate every printed code). The form is laid out in three sections.
3.1 Identity and offer
- Slug — the short code that appears in the QR URL. Use uppercase letters, digits, and dashes (e.g.
VP-2606-KIR). Maximum 24 characters. It is normalized to alphanumeric-only when stored, soVP-2606-KIRandvp2606kirresolve to the same campaign. - Campaign name — the human-readable label. This is what shows up in the campaign list, in the POS, and on the printed A6 card.
- Channel — the distribution channel (
valpak,HTC,yelp, …). Used purely for reporting. - Source label — the value passed to the ordering app as the
?src=query parameter. Defaults to the channel; override it if you want analytics in the PWA to distinguish two campaigns that share a channel. - Status —
draftwhile you are setting it up,activeonce you are ready for live traffic,pausedto temporarily disable the redirect without ending the campaign, orendedwhen the campaign is permanently retired. - Fulfillment restriction — leave as
Any, or restrict the discount todine_in,takeout, ordelivery. The POS enforces this at checkout: a takeout-only coupon cannot be applied to a dine-in ticket. - Discount type —
Percent offorFixed amount ($). - Discount value — the numeric amount. For percent, enter the whole number (
15means 15% off). For fixed, enter the value in cents (500means $5.00 off). The form hint reminds you. - Min order (cents) — the minimum subtotal the coupon requires.
0means no minimum. - Max uses per customer — how many times the same identity (phone or email hash) may redeem this offer. Typically
1. - Start date / End date — the validity window, in your browser's local time. Outside this window the redirector serves a fallback page instead of the offer.
- Expected impressions — optional. If you know the size of the Valpak drop (e.g. 50,000 mailers), enter it here so the system can compute CAC.
- Drop cost (cents) — optional, the cost of the distribution channel for the same CAC math.
- Redirect target (PWA URL) — where to send the customer after a successful scan. Usually your store's online ordering URL.
- Notes — free-form internal notes; never shown to the customer.
3.2 Campaign type and offer scope
Two campaign types are supported:
- Coupon (order or item discount) — the default. The discount you entered above applies either to the whole order (if you leave Target item name blank) or to a specific menu item (if you enter the item name in Target item name — e.g.
Pad Thai). - BOGO / Conditional ("Get X if you order Y") — switching to this type reveals two sub-sections:
- Trigger condition — what the customer must order to qualify. Pick a trigger type (item quantity or category quantity), enter the item or category name, and set the minimum quantity that triggers the offer.
- Reward — what the customer gets. Pick a reward type (
free_itemoritem_discount), enter the reward item name, set the max reward quantity, and — foritem_discount— enter a discount value override (e.g.50for 50% off the reward item, or200for $2.00 off). The override reuses the discount type set in section 3.1.
The two scopes are mutually exclusive: a Coupon campaign has a target, a BOGO campaign has a trigger plus reward, and the form hides whichever section does not apply.
3.3 Schedule restriction
Schedule restriction is optional. Leave everything blank and the offer is valid every day, all day, throughout the validity window. Otherwise:
- Days of week — tick any subset of Sun through Sat. The offer is valid only on those weekdays.
- Window start / Window end — a 24-hour
HH:MMdaypart. The offer is valid only between those two times of day.
Combine them to express things like "weekdays 3pm – 6pm only" for a happy-hour campaign.
3.4 Saving
Click Save campaign to persist your changes. The form will redirect back to the campaign list on success and pop up an alert if validation fails (the slug must be unique, the end date must be after the start date, the discount type must be percent or fixed_cents, and so on).
4. The campaign detail page
Click any campaign in the list to open its detail page. It is divided into a header, a left-hand information panel, and a right-hand QR-code panel.
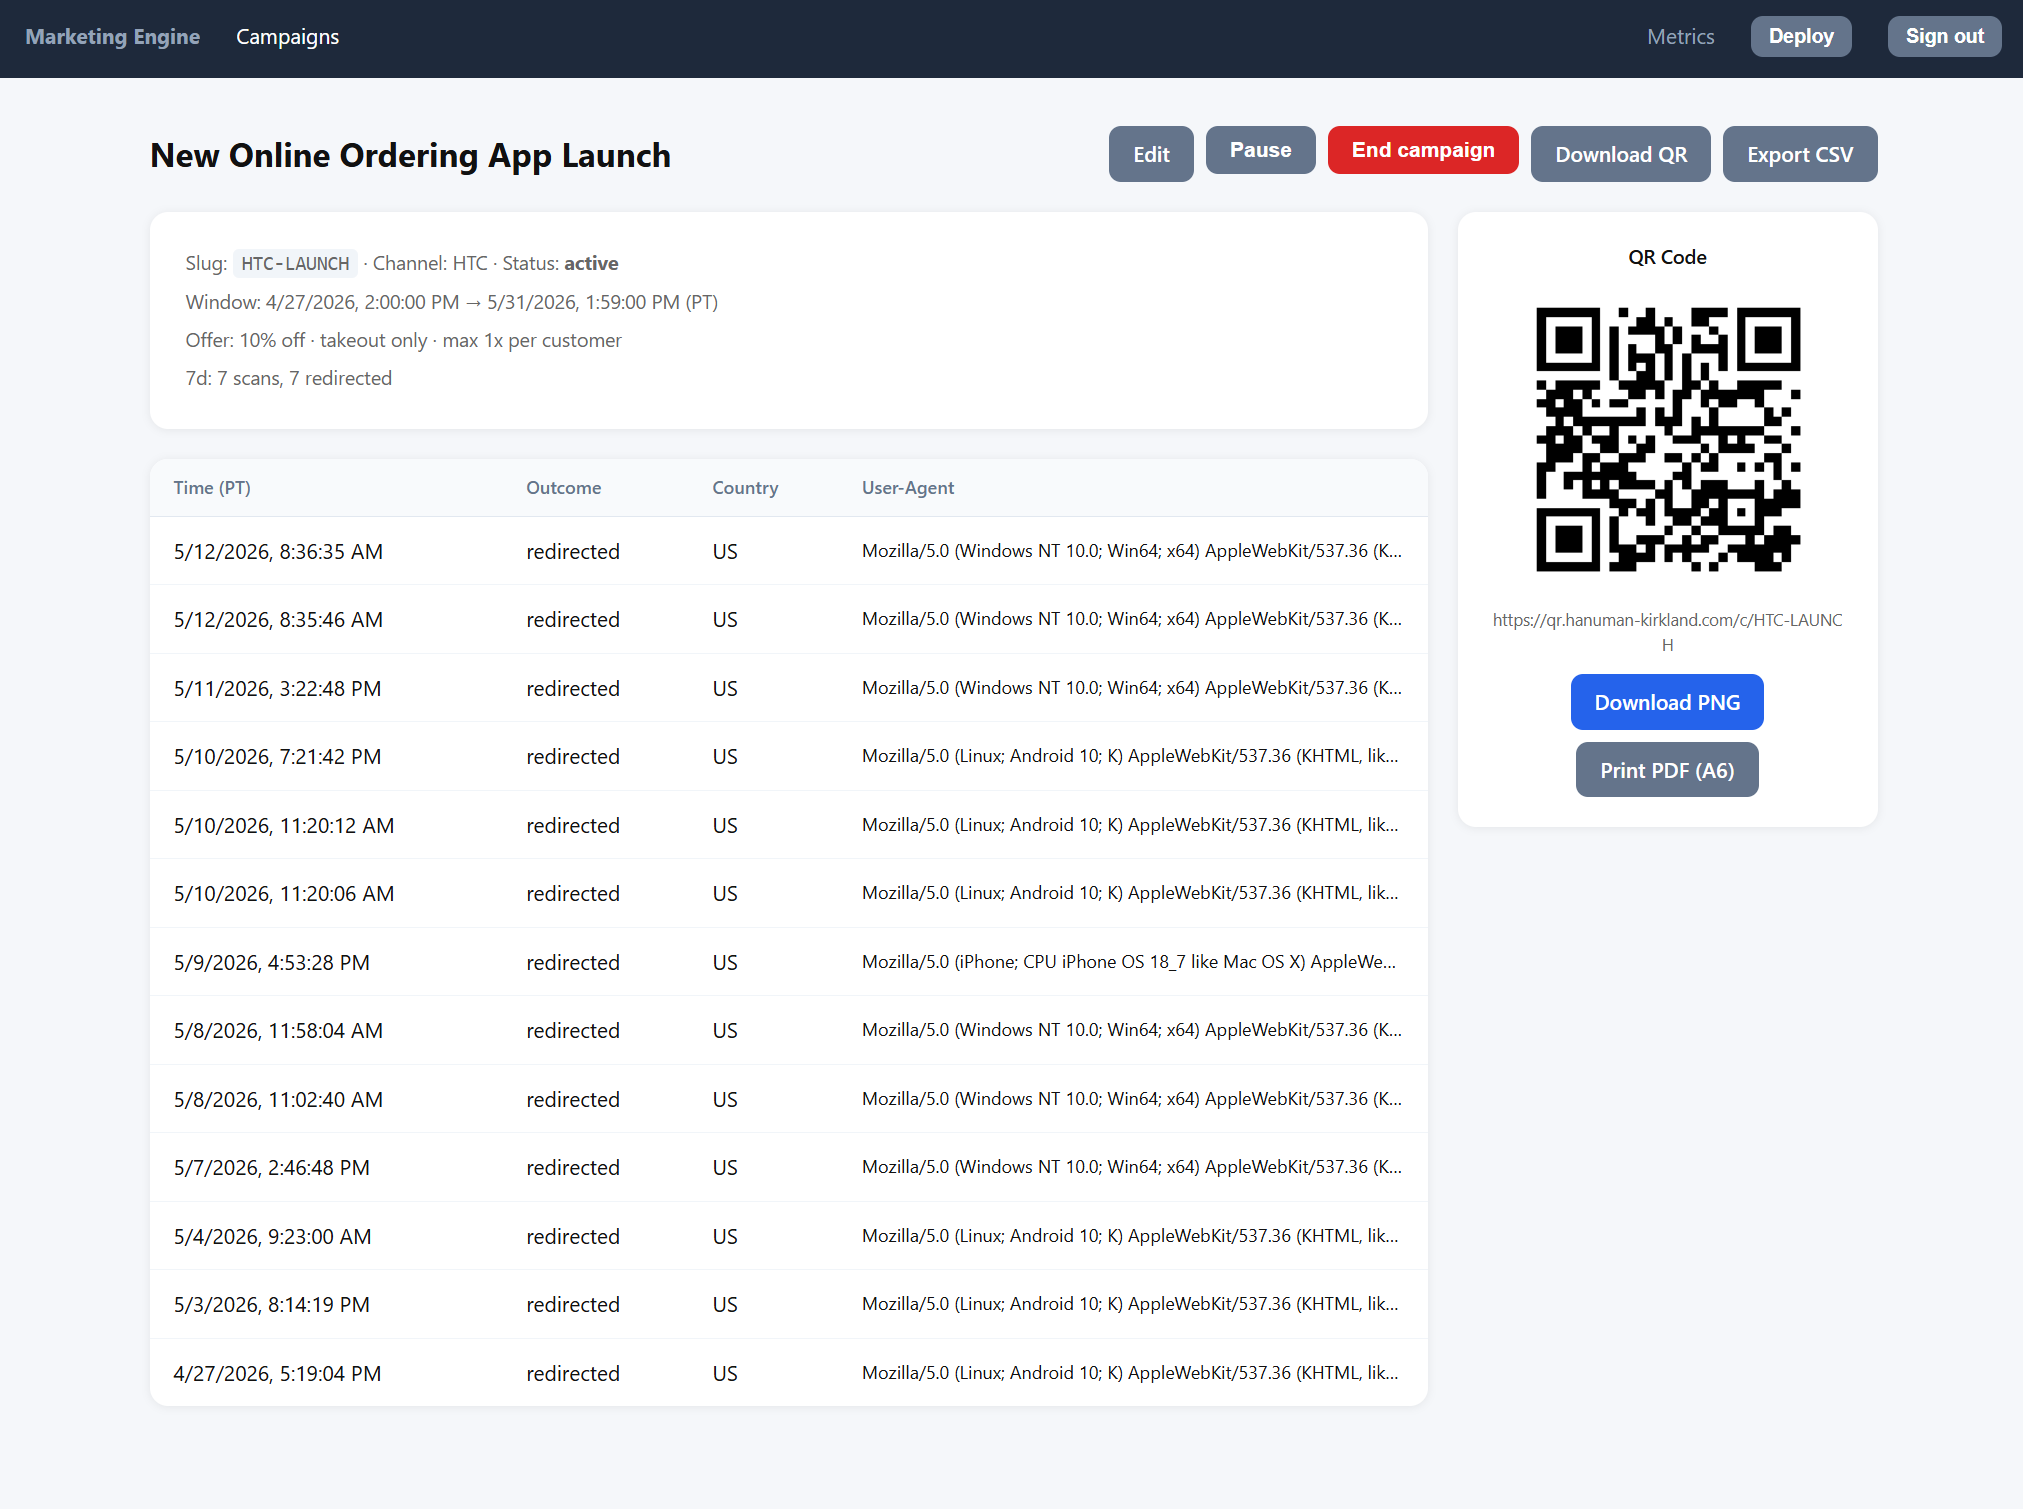
4.1 Header buttons
The buttons available depend on the current status:
- Edit — open the campaign in the edit form.
- Pause — only shown when the campaign is
active. Pauses traffic immediately: the redirector falls back to the default page until you resume. - Resume — only shown when the campaign is
paused. Re-activates traffic. You cannot resume a campaign whose end date has already passed; end it and create a new one instead. - End campaign — hidden once a campaign is already
ended. Confirm carefully: this setsend_atto the current moment and the campaign cannot be reopened. - Download QR — downloads a 512 × 512 PNG of the QR code, ready to embed in a Valpak mailer or a poster. You can request other sizes via the
?size=query parameter; the server clamps it to the 64 – 2048 range. - Export CSV — downloads the full scan log for the campaign with one row per scan: scan id, timestamp (ISO 8601), outcome, country, slug requested, code requested, and the hashed IP.
4.2 Information panel (left)
Shows the slug, channel, status, validity window in Pacific Time, and a one-line summary of the offer (discount, fulfillment restriction, minimum order, and per-customer cap). Underneath is a 7-day summary of total scans and the number that were redirected.
Below that is the recent-scans table — the twenty most recent scans, newest first. For each scan you see:
- Time (PT) — when it happened.
- Outcome —
redirectedif the customer was successfully sent to the PWA,fallbackif the campaign was inactive or outside its window,invalid_slugif the QR encoded a slug that doesn't exist,invalid_codefor an unknown coupon code,code_already_redeemedfor a duplicate redemption, orrate_limitedif too many requests came from the same IP. - Country — derived from the Cloudflare
CF-IPCountryheader. - User-Agent — the browser string from the device that scanned the code.
The recent-scans table is capped at twenty rows for readability. For the full log, use Export CSV.
4.3 QR code panel (right)
Shows a 200 × 200 preview of the campaign's QR code, the underlying URL (https://<host>/c/<slug>), and two download buttons:
- Download PNG — the same 512 × 512 PNG as the header Download QR button.
- Print PDF (A6) — a print-ready A6 card (105 × 148 mm) with the campaign name, a centered QR code, the slug, a large discount headline (e.g.
10% OFF YOUR ORDER), the minimum-order / fulfillment / expiry details, and a footer URL. Use this for small print-test drops before committing to a Valpak run.
5. How a scan works (and what the customer sees)
The QR codes you print encode https://<your-marketing-host>/c/<slug>. When a customer scans:
- The redirector normalizes the slug (uppercase, alphanumeric only) and looks it up.
- It rate-limits the request by hashed IP (with a daily-rotated salt) to prevent enumeration and abuse.
- If the campaign exists, is
active, and the current time is inside the validity window, it logs a scan row with outcomeredirectedand 302-redirects to yourredirect_targetwith three query parameters appended:c=<slug>,src=<source_label>, andt=<scan_id>(the ULID, used to correlate the scan with the eventual order in the POS). - If the campaign is
draft,paused,ended, or out-of-window, the outcome isfallbackand the customer is sent to the campaign'sfallback_url(or the default landing page if none is set). - If the slug is unknown, the outcome is
invalid_slugand the customer is sent to the default landing page with?src=unknown_campaign.
Every scan is recorded — even invalid ones — so you can investigate misprints or scraping attempts in the CSV export.
For campaigns with coupon_code_required = 1, the URL is /c/<slug>/<code> and the redirector additionally validates the per-coupon code, rejects duplicates, and stamps the code as scanned. The merchant POS later flips it to redeemed once the order is paid (via the /internal/coupon/redeem endpoint).
6. Pause vs. End — which to use?
- Use Pause when you want to stop traffic temporarily — e.g. a kitchen capacity issue or a pricing mistake you need to fix. The campaign stays in the list, the QR code keeps working (it just redirects to the fallback), and you can Resume when ready.
- Use End campaign only when you are permanently retiring the offer. End is irreversible — it sets the end date to right now — and
Resumeis rejected on ended campaigns by design.
In both states the campaign is excluded from the public GET /api/campaigns feed that the customer-facing PWA polls, so even ambient (auto-apply) offers will disappear from the checkout screen.
7. Deploy
The Deploy button in the top nav runs git pull origin main followed by sudo systemctl restart marketing-engine on the host. It is intended for the operator pushing a hotfix from the source repository — not for everyday use. After clicking, the button shows "Restarting…" and the page automatically reloads after about eight seconds; if the deploy fails, an alert will tell you and the deploy log lives at ~/deploy-marketing.log on the server.
8. Metrics
The Metrics link in the top nav returns a small JSON document with scan totals broken down by outcome across three rolling windows: the last hour, the last 24 hours, and the last 7 days. It is intended for integration with monitoring dashboards rather than as an interactive UI. For per-campaign analytics, open the campaign detail page or download its CSV.
9. Operational notes
- Sync to the POS. A background job pushes every campaign whose
updated_athas advanced to the merchant POS every 60 seconds. If the POS is unreachable, the sync silently retries — the redirector keeps working in the meantime. Changes you make in the admin panel may therefore take up to a minute to appear at the register. - IP allowlist. The
/marketing/*admin routes are protected by an IP allowlist middleware in addition to the login. If you cannot reach the login page from a new location, ask your administrator to add the office or VPN range. - Slug normalization. Slugs are matched case-insensitively and stripped of non-alphanumerics, so a printed code with a stray space or lowercase letter still resolves. The canonical form is what you typed in the form.
- IP hashing. Visitor IPs are never stored in plaintext. They are hashed with SHA-256 and a daily-rotated salt; raw IPs are unrecoverable from the database.
- Rate limiting. The public scan endpoint and the preview/instance endpoints are both per-IP rate-limited. Customers hitting the limit see a "Too Many Requests" page; the scan is still logged with outcome
rate_limitedso you can detect abuse in the CSV.
10. Quick reference — campaign lifecycle
- Draft — create the campaign with status
draftwhile you finalize copy, dates, and the discount. - Active — flip to
activewhen the QR is printed and the offer is live. The PWA and POS will pick the change up within 60 seconds. - Paused — temporarily disable scans (kitchen issue, pricing bug, weather closure). Resume when ready.
- Ended — permanent retirement. The campaign stays in the list for historical reporting, but no longer redirects and is no longer synced as live.
That's the whole loop. Build the campaign, print the QR, watch the scans, export the CSV when the drop closes, and end the campaign when you are done.